Did you know about 70% of gamers prefer Solid State Drives (SSDs) over Hard Disk Drives (HDDs)? They like the faster load times. Choosing the right parts for your gaming computer is key. With graphics cards costing $300 to $1,500, planning your budget is important.
Introduction to Building a Gaming PC
Building a gaming pc can be fun and rewarding. But, it needs some knowledge and planning. First, decide what you want your gaming pc to do and how much you can spend. This will help you pick the right parts, like a strong graphics card and fast processor.
Key Takeaways
- Determine the purpose and budget of your gaming pc to choose the right pc gaming components
- Consider the minimum system requirements for the games you want to play on your custom gaming computer
- Choose between SSDs and HDDs for storage, with SSDs giving faster load times and better energy use
- Select a powerful graphics card and a fast processor to build a gaming pc that meets your needs
- Plan and budget to build a custom gaming computer that balances performance and cost
- Think about the rising system requirements of future games when building a gaming pc
- Watch CPU and GPU temperatures to avoid overheating during long gaming sessions
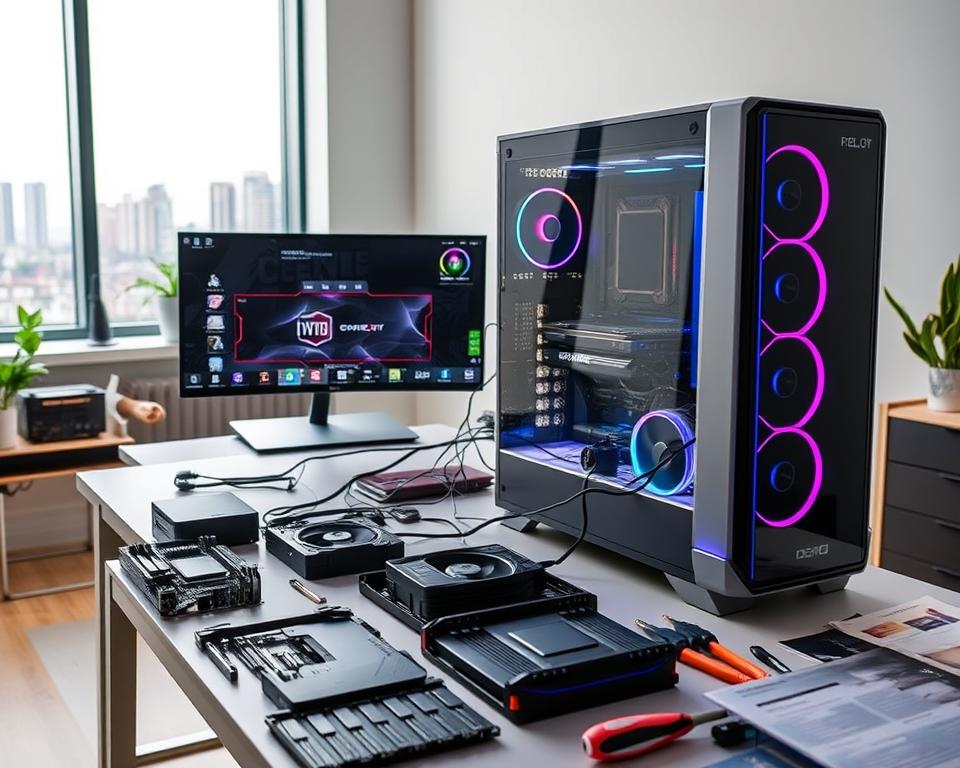
Essential Tools and Workspace Preparation
Starting to build a gaming pc requires a clean, well-prepared workspace and the right tools. A space of at least 5 feet long and 3 feet wide is best. Having the best parts is key, but the right tools make assembly easier. A torque or ratchet screwdriver with different heads is a must, and it’s usually affordable.
For a smooth build, you’ll need specific tools. A #2 Phillips screwdriver is great for most tasks, and a #1 Phillips is best for small M.2 drives. Isopropyl alcohol cleans thermal compounds, and compressed air keeps dust away, helping your parts last longer.
Other important items include zip ties for cable management, a headlamp for dark spots, and rubber-soled shoes and anti-static bags to prevent static. With these tools and materials, you’re ready to start building your gaming pc.

- Torque or ratchet screwdriver with interchangeable heads
- #2 Phillips screwdriver
- #1 Phillips screwdriver
- Isopropyl alcohol
- Compressed air
- Zip ties
- Headlamp
- Rubber-soled shoes and anti-static bags
By following this guide and using the right tools, you can build a powerful gaming pc that fits your needs and budget.
Understanding Basic Gaming PC Components
Building a gaming PC starts with knowing the basic parts. The pc gaming components are the CPU, motherboard, graphics card, and RAM. These parts work together for a great gaming experience. To build a budget gaming pc, pick parts that fit well together and meet game requirements.
Key parts to think about are the CPU, which does all the math, and the motherboard, which connects everything. The graphics card makes images on your screen. RAM helps with data storage, and 16GB is a good start for smooth gaming. Knowing these parts and following gaming pc setup tips helps you create a powerful PC within your budget.

Also, don’t forget the power supply unit (PSU). It should power all your parts well. A good PSU keeps your PC cool and stable. By picking the right pc gaming components and following gaming pc setup tips, you can make a PC that’s both powerful and affordable. This way, you can build a budget gaming pc that’s just right for you.
Selecting the Perfect Parts to Build a Gaming PC
Building a gaming PC requires choosing the right parts for a great gaming experience. You need to think about your budget, the games you play, and how fast you want it to be. A custom gaming computer can be made just for you, giving you a gaming experience that’s all your own.
It’s important to follow a gaming pc building tutorial to get the best value for your money. You’ll need a strong CPU and a top-notch GPU. The CPU does all the math, and the GPU makes the images on your screen look amazing.
Here are some key things to think about when picking your parts:
- CPU: Look for a high clock speed and multiple cores for smooth performance.
- GPU: Choose a GPU that can handle the types of games you want to play, with sufficient VRAM for high-resolution gaming.
- RAM: Ensure you have enough RAM to handle the demands of your games, with at least 8GB recommended.
- Storage: Consider a fast SSD for your operating system and games, with a minimum capacity of 512GB.

By picking your parts wisely and following a gaming pc building tutorial, you can make a strong custom gaming computer. It will meet your gaming needs and fit your budget. Whether you’re into casual gaming or serious gaming, the right parts make a big difference.
Planning Your Budget and Component Priorities
Building a gaming PC starts with planning your budget and choosing the right parts. A gaming pc assembly guide can guide you on how to allocate your budget. It’s important to set a realistic budget, usually between $500 to $1000 USD for a budget gaming PC.
To build a budget gaming pc, look into refurbished parts. They can save you 30% to 70% compared to new parts. For instance, a refurbished AMD Ryzen 5 5600X costs about $160. An NVIDIA GTX 1660 Super (refurbished) is around $200. Focus on the graphics card and CPU, as they are key for gaming.
A good gaming pc setup balances performance and cost. Here are some essential components to consider:
- CPU: AMD Ryzen 3 series or Intel Core i3 series for a balance of performance and price
- GPU: Mid-range budget graphics cards like the NVIDIA GTX 1660 Super or AMD Radeon RX 5600 XT
- RAM: A minimum of 16GB of RAM for optimal gaming performance
- Storage: A smaller SSD (240GB or 500GB) for the operating system and critical applications, paired with a larger HDD (1TB or 2TB) for additional storage
By following these gaming pc setup tips and focusing on key components, you can create a powerful gaming PC. Don’t forget to include a portion of your budget for peripherals like a monitor, keyboard, and mouse to complete your setup.

Preparing for the Build Process
Learning to build a gaming PC starts with preparation. First, unbox components carefully to avoid damage. This means handling sensitive parts with extra care. Also, set up your workspace well so you have all tools and materials ready.
A good tutorial can guide you through this step. It helps a lot.
About 60% of gamers like building their PCs. They do it for customization and satisfaction. To do this well, picking the right parts is key. You need a good CPU, GPU, motherboard, and more that fit your needs and budget.

It’s also important to read manuals and guides. They help you avoid mistakes. For example, forgetting to connect the CPU power connector can stop your system from starting. A detailed tutorial and careful steps can make your build go smoothly.
Some important things to think about when getting ready to build include:
- Unboxing components safely to prevent damage
- Organizing the workspace to ensure all necessary tools and materials are within reach
- Reading manuals and documentation to understand the installation process
By following these steps and choosing the right parts, you can build a powerful gaming PC. It will meet your needs and fit your budget.
Step-by-Step PC Assembly Guide
Building a gaming PC can seem daunting, but it’s doable with the right guide. A custom gaming computer assembly guide is key. It helps you through each step smoothly. Start by setting up your workspace and collecting all parts, like the CPU, motherboard, and more.
First, put the CPU on the motherboard carefully. Then, place the motherboard in the case and secure it. Add RAM and storage next. Don’t forget the power supply. Cable management is also important to keep things tidy and improve airflow.

- CPU: AMD Ryzen 5 7600X or Intel Core i5-13600K
- GPU: NVIDIA GeForce RTX 4060 Ti or AMD Radeon RX 7600
- RAM: 16GB or 32GB
- Storage: Samsung 980 Pro 1TB NVMe SSD and WD Blue 2TB HDD
- Power Supply: EVGA SuperNOVA 750 G6 or Corsair RM850x
By following these steps and choosing the right parts, you’ll build a top-notch gaming PC. Always use a gaming pc assembly guide for a successful build.
BIOS Setup and System Configuration
After putting together a gaming PC, the next step is setting up the BIOS and configuring the system. This is key for a smooth and efficient PC. When building a budget gaming PC, following setup tips is vital for the best performance. A building tutorial can offer great help in this process.
One of the first steps is to set the boot order in BIOS. This is done by pressing a function key, like F2 or DEL, when starting up. The boot order decides which device to boot from first, like the hard drive or SSD. It’s also important to turn on Secure Boot. This boosts security by checking software integrity before booting.
Users can also tweak settings like RAM and graphics card configurations. Turning on XMP (Intel) or EXPO (AMD) can unlock RAM’s full power. This is often set to default JEDEC profiles that don’t show the advertised specs. Resizable BAR can also boost gaming by up to 12% on Nvidia and 15% on AMD graphics cards.

For those building a budget gaming PC, following a building tutorial is key. It ensures all parts are set up right. By following these tips, users can make their system run better and enjoy gaming without issues.
Conclusion: Enjoying Your Custom Gaming PC
Congratulations on building your own custom gaming PC! You’ve got a powerful machine ready for amazing gaming. It’s equipped with a fast AMD Radeon™ RX 6600 XT graphics card and a 13th-generation Intel Core™ processor.
Windows Installation Guide
Now, it’s time to install the operating system. Just follow the on-screen instructions to set up Windows. Make sure to use at least a 1TB solid-state drive (SSD) for your primary drive.
Essential Driver Updates
After installing Windows, update your system’s drivers. Visit the manufacturer’s websites for the latest graphics and chipset updates. This will make sure your custom gaming computer runs smoothly.
Basic System Optimization
Lastly, optimize your system settings for gaming. Adjust power management and enable game mode. Consider upgrading to 16GB or higher RAM for better multitasking. With these steps, you’re ready to enjoy your favorite games on your custom-built PC.